

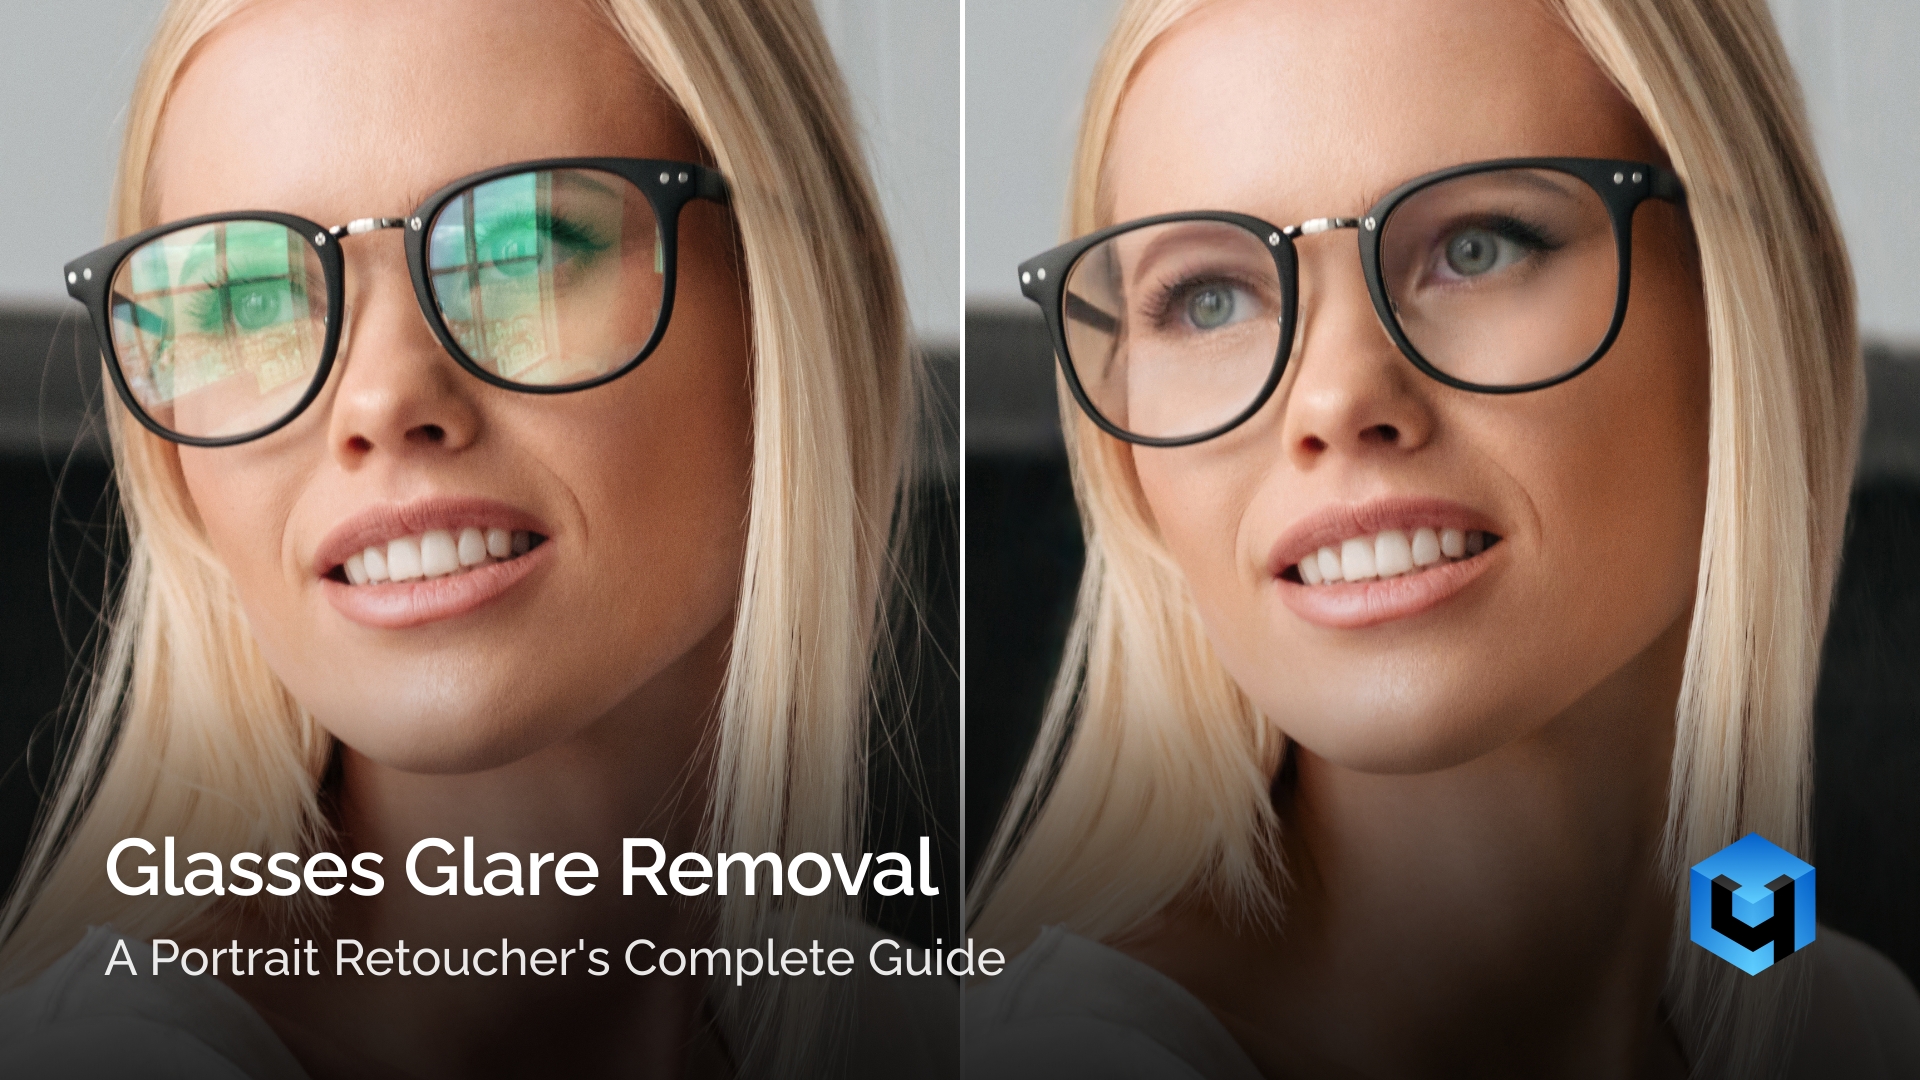
Every portrait photographer encounters glasses glare eventually — many encounter it on every session. Glare in pictures of subjects who wear glasses follows predictable patterns based on light position, lens coating, and shooting distance. This guide walks through the complete workflow: from preventing reflections and glare on set to removing eyeglass glare in Photoshop at every severity level. It also covers how to remove unwanted glare using AI-assisted approaches, common retouching mistakes, and how Retouch4me tools fit into the finishing stage of a large portrait series.
Table of Contents
Prevention Is Better Than Cure
The Two-Exposure Composite Technique
When the Reflection Shows the Photographer or Scene
Retouch4me Workflow After Glare Removal
Why Glasses Glare Happens
Glasses glare forms when light bounces off the lens surface at an angle that directs it straight toward the camera sensor. The intensity of reflections and glare depends on three variables: where the light source sits relative to the glasses, what coating the lenses carry, and what material they are made from.
The physics are straightforward. Whatever angle light strikes a smooth surface, it leaves at the same angle on the opposite side. Place a light source directly in front of your subject and the lens redirects a portion of that light back into your camera — this is the most common source of eyeglass glare in portrait work.
Lens coating makes a significant difference. Standard uncoated lenses reflect roughly 8% of visible light. Modern anti-reflective (AR) coatings reduce those reflections dramatically, often to around 1% or less. A subject wearing older or budget glasses without AR coating is noticeably harder to photograph under direct light.
Lens material also plays a role. High-index lenses, the thinner and lighter option for strong prescriptions, reflect more light than standard plastic. The reason is that their higher refractive index increases surface reflectivity. Progressive lenses can produce more complex reflections in glasses because of their continuously changing optical geometry.
Not all light sources cause equal glare from glasses. The most common culprits are:
- Direct on-camera flash, which fires straight at the subject’s glasses
- Ring lights, which create circular reflections across both lenses simultaneously
- Large softboxes positioned at or near eye level
- Hard window light coming from the front or side
Overhead ambient lighting is another frequent problem, especially in corporate headshots, events, and conference photography. The scene may look fine to the naked eye, but the camera often records bright spots across one or both lenses.
Recognizing the source of glare from your glasses allows you to fix it on set instead of spending unnecessary time removing glare in Photoshop later.
Prevention Is Better Than Cure
In eyeglasses photography, the most efficient approach to glasses glare is eliminating it before the shutter fires. Small adjustments to light position, camera angle, or the subject’s pose take seconds on set and can save significant retouching time across a full portrait series.
Light Position Is the First Variable to Control
The angle between your light source and the subject’s glasses determines whether glare on your glasses appears at all. Direct frontal lighting at eye level is the worst configuration. It sends light straight into the lens and bounces it straight back at your camera.
Moving your main light roughly 35–45 degrees to one side often reduces glare from glasses immediately. If you work with a two-light setup, both sources need to be repositioned. A light that looks fine on its own can create unwanted glare once a second source is introduced.
Raising the light slightly, positioning it above eye level and angling it downward will often reduce the glare. This changes the reflection angle so it no longer reaches the camera.
Ask Your Subject to Make Small Adjustments
You do not always need to move your lights. Minor changes to the subject’s position can reduce glare glasses just as effectively.
Ask the subject to:
- Tilt their chin slightly downward, which changes the lens angle relative to the light
- Turn their head a few degrees to one side
- Tilt the glasses slightly downward on the face
These are small, natural adjustments. Most subjects won’t notice the difference in the final image, but the glare will be gone.
Use a Polarizing Filter on Your Lens
When it comes to natural light shooting, a circular polarizing filter (CPL) is often the most practical optical solution. A polarizing filter portrait photographers rely on can help reduce glare on glasses in certain lighting situations. Rotating the filter changes which polarized light reaches the camera sensor. In favorable lighting, it can noticeably reducereflections from glass surfaces.
A CPL does not eliminate all glare in all situations, but it handles the most common case: bright ambient light reflecting off the front lens surface. A polarizing filter is often less effective with studio strobes than with natural light because not all reflections become strongly polarized.
Recommend AR-Coated Lenses to Regular Clients
Any professional photographer working with regular clients will find this worth mentioning. This tip is easy to overlook but useful if you work with recurring clients — corporate headshot series, seasonal family portraits, or ongoing editorial work. Standard lenses reflect around 8% of visible light. Modern anti-reflective coatings reduce that to roughly 1% or less.
If a client photographs regularly and consistently struggles with glare from glasses, mentioning AR coating is practical advice that benefits both of you. It does not eliminate the problem under all lighting conditions, but it reduces the baseline significantly.
Shoot a Clean Backup Frame
When lighting adjustment is not enough, the two-exposure technique gives you a clean foundation for post-production work. The method is simple: you shoot two frames from the same position — one with the subject wearing their glasses, and one without.
The frame without glasses provides an unobstructed view of the eyes and surrounding facial features that can be blended into the glasses frame. In Photoshop, you blend the two images using a mask, removing glare from glasses completely and replacing the affected area with clean detail from the second frame. The result looks natural because the lighting, skin tone, and eye position are closely matched across both shots.
To make this work reliably on set:
- Use a tripod or lock your camera position between frames
- Keep lighting unchanged between shots
- Ask the subject to hold the same expression and head position as closely as possible
- Shoot the no-glasses frame immediately after the glasses frame, before position drifts
- Disable autofocus between frames if necessary
The two-exposure technique is covered in full detail in the advanced section below. Good preparation on set makes the two-exposure workflow much faster during post-processing.
Move yourself, not just the light
Sometimes shifting the camera a few inches left, right, up, or down is enough to move the reflection completely out of the lens without changing the lighting setup.
Adjust Your Camera Position
Even a small change in camera height or shooting angle can redirect reflections fromglasses away from the lens. Before moving lights or asking the subject to adjust their pose, try taking a step to one side or raising the camera slightly. Minor camera movements often eliminateglare while preserving the overall lighting pattern.
Quick Fixes in Photoshop
Knowing how to get glare off glasses and how to remove eyeglass glare in Photoshop depends first on how much eye detail remains visible beneath the reflection. For removing glare from glasses caused by small brightspots or soft diffuse hotspots, three tools cover most situations without complex compositing: Spot Healing Brush, Clone Stamp Photoshop, and the Camera Raw Filter.

Spot Healing Brush
The Spot Healing Brush is the fastest starting point for how to edit glare out of glasses when the affected area is small. It automatically samples surrounding pixels and blends them into the selected area.
Set the brush to these values before you start:
- Mode: Normal
- Type: Content-Aware
- Brush size: slightly larger than the glare area
Paint over the glare in one smooth stroke. Photoshop analyzes the surrounding lens texture and skin tone, then blends the sampled pixels into the affected area. On isolated, low-contrast glare, this often produces a clean result in a single pass.
The Spot Healing Brush struggles when glare covers a large area, sits directly over the eye, or has a hard edge that contrasts sharply with the surrounding pixels. In those cases, move to the Clone Stamp.
Clone Stamp Tool
Clone Stamp Photoshop gives you manual control over which pixels are used as a source. This matters when the glare sits over a complex area — the edge of an iris, a catchlight, or the transition between lens and skin.
Work on a new layer with “Sample: Current & Below” or “All Layers” enabled to keep the edit non-destructive. This is a core principle of non-destructive retouching— every change stays reversible throughout the process.
Basic settings:
- Opacity: 40–60% for blending, 100% for direct replacement
- Flow: 30–70%, depending on how gradually you want the effect to build
- Hardness: 0–20% (soft edge blends more naturally)
- Aligned: on
Sample clean lens texture near the glare area, then paint over the hotspot in short strokes. Avoid cloning across the edge of the eyeglass frame, as repeating frame details are much more noticeable than repeating lens texture. Resample often. Do not clone from a single source point across a large area, or the result will show repeating texture patterns.
Catchlight eyes — the small specular highlights in the eye — should be preserved or recreated after cloning. Removing them entirely gives the eyes a flat, lifeless appearance. If you recreate or preserve catchlights, keep them consistent with the direction and size of the original lighting.
Camera Raw Filter
For soft, diffuse glare — the kind that makes a lens area look washed out without a sharp hotspot — the Camera Raw Filter handles removing glare from glasses without any pixel replacement. This method reduces brightness and restores local contrast in the affected area.
Steps:
- Duplicate your background layer
- Go to Filter → Camera Raw Filter
- Switch to the Masking panel and create a radial gradient over the glare area
- Inside the mask, reduce Exposure, increase Contrast, and lower Highlights
- Fine-tune Clarity or Texture if needed
- Adjust Whites and Shadows to match the surrounding lens area
This approach does not reconstruct missing details. Instead, it reduces the brightness of the overexposed area so it blends with the rest of the lens. It works well when glare from window light or a large softbox creates a blown-out zone without completely destroying the underlying texture.
| Method | Best For | Difficulty | Time | Result Quality |
|---|---|---|---|---|
| Spot Healing Brush | Small, isolated hotspots | Low | Fast | Good for minor glare |
| Clone Stamp | Complex areas, eye edge, large patches | Medium | Moderate | High with careful work |
| Camera Raw Filter | Soft, diffuse overexposure | Low | Fast | Good, no pixel replacement |
| Two-Exposure Composite | Severe glare, full lens coverage | High | Slow | Highest quality |
| AI Tools | Complex glare without a backup frame | Low | Fast | Good for simple reflections, inconsistent for severe glare |
Once glare completely obscures the eye or replaces important facial detail, no single-layer retouching method can restore information that was never captured. In those situations, the two-exposure composite technique delivers the most natural result.
The Two-Exposure Composite Technique
The two-exposure composite is the most reliable method for how to remove eyeglass glare in Photoshop. It produces natural results even when glare covers the eye completely, because it does not attempt to reconstruct missing detail. Instead, it uses real information from a second frame to replace what was lost. The technique requires preparation on set, but the post-production workflow is straightforward once you have both files.

Setting Up the Blend in Photoshop
Open both images in Photoshop. Place the no-glasses frame as a layer above the glasses frame, so it can be revealed only where needed. Align the two layers precisely. If you shot on a tripod, they will likely already match. If there is minor drift, use Edit → Auto-Align Layers to correct it.
Tip: For critical work, temporarily switch the top layer to Difference mode. Areas that align correctly will appear nearly black, making small misalignments easy to spot before masking.
Once the layers are aligned:
- Add a black layer mask to the top (no-glasses) layer. This hides it completely and reveals the glasses frame below.
- Select a soft round brush, set Opacity to 100%, and paint with white on the layer mask only where glare obscures important eye detail.
- The painted area reveals the clean eye detail from the no-glasses frame.
- Lower the brush opacity near the lens edges if needed to blend the transition naturally.
The mask should cover only the interior of the lens. The frame, temples, and surrounding skin should always come from the glasses layer, so the glasses remain present and consistent in the final image.
Painting Back Eye Detail
With the blend in place, check the eye area carefully. You may need to restore several elements that read as flat or missing after the composite:
- Iris detail — confirm the colour and sharpness of the iris match the rest of the image
- Catchlight eyes — if the glasses frame was caught with a specific key light position, the no-glasses frame may show catchlights in a slightly different location; if necessary, subtly blend or retouch the catchlights so they remain consistent with the lighting in the glasses frame
- Eyelid edge — the boundary between lid and lens can show a hard composite line; refine the layer mask with a soft brush to remove any visible transition
- Skin tone under the lens — the no-glasses frame sometimes reads slightly warmer or cooler than the glasses frame if lighting or white balance shifted slightly between frames; use a Curves adjustment clipped to the no-glasses layer to match
View the image at 100% zoom while refining the eyes. Even subtle inconsistencies become obvious in close facial portraits.
When You Do Not Have a Second Frame
If no no-glasses frame was shot, you can use a frame from a different moment in the same session, provided head position, expression, and lighting are close enough to align. This is not ideal, but it often works for straight-on headshots where the subject’s head position did not change significantly between frames.
A clean frame from a different angle is not usable for this technique. Mismatched perspective makes convincing alignment extremely difficult.
When no usable second frame exists at all, the quick fix methods from the previous section are your only option in post, or you may need to rely on generative AI reconstruction, covered in a later section.
When the Reflection Shows the Photographer or Scene
When reflections in glasses contain a recognisable image — the photographer, a window, or a room full of guests — standard glare removal methods are not enough. This type of reflection from glasses replaces eye detail entirely and requires either a clean backup frame or manual reconstruction from adjacent visual information.
This type of reflectionin glasses is most common in three situations: close-range shooting with on-camera flash, shooting in rooms with large bright windows behind the camera, and outdoor portraits where the sky or a bright building reflects into the glasses at an angle.
When a Second Frame Is Available
If you shot a clean no-glasses frame, thetwo-exposure composite described in the previous section handles this problem completely. The reflection, regardless of how complex, is replaced with real eye detail from the backup frame. No reconstruction required.
This is the strongest argument for making the two-exposure backup frame a standard part of any portrait session involving eyeglasses. It takes only a few extra seconds during the shoot but can save hours of difficult headshot retouching later.
When No Second Frame Exists
Without a backup frame, you are working with genuinely missing information. The reflection has replaced the iris, pupil, and surrounding eye detail with an image of something else entirely.
Clone from a nearby clean frame — If the session includes multiple frames with the subject in a similar position, look for one where the reflection falls differently or does not appear at all. Even partial clean information from another frame is more reliable than reconstruction from scratch.
Symmetry from the opposite eye — If one lens is clean and the other shows a scene reflection, you can mirror and reposition the clean eye to reconstruct the affected side. Copy the clean eye area to a new layer, flip it horizontally, and align it over the reflected lens. If necessary, use Warp or Liquify for final alignment before masking the edges. Human eyes are often similar enough that the opposite eye can provide a convincing starting point, especially in straight-on portraits.
Generative Fill — Photoshop’s Generative Fill can generate plausible replacement detail from context. Select the reflection area with the Lasso tool, invoke Generative Fill, and let the model generate replacement content. Results are inconsistent. It works well on simple cases but can produce anatomically unconvincing eyes on complex or asymmetric faces. Always compare the result at 100% zoom before accepting it.
Managing Photographer Reflections Specifically
A reflection of the photographer is a specific and common subtype. It appears most often in tight headshots with a short shooting distance and glasses with a strong curve.
The most practical prevention is shooting distance. Moving further from the subject and using a longer focal length reduces the glare and the camera’s presence in the lens reflection significantly. The photographer occupies a smaller portion of the reflection, making it less noticeable and easier to avoid. Combined with a 35–45 degree light angle, photographer reflections become rare rather than routine.
If you cannot prevent them on set and no clean backup frame exists, the opposite-eye symmetry method is often the quickest starting point.
Common Mistakes to Avoid
Removing glare from glasses is one of those retouching tasks where small mistakes add up quickly. The result can look technically clean at a glance but still look unnatural in the final image. Most mistakes fall into a few repeating patterns.
Over-Cloning
The most common error is cloning too aggressively across a large glare area from a single source point. The result is repeated texture, a patch of skin or lens surface that appears two or three times within the same lens. It immediately looks retouched, even to non-photographers.
Clone from multiple source points. Work in short strokes, resample frequently, and change your source location every few brushstrokes. Experiment with different source points rather than sampling from one spot repeatedly. The more varied your sampling points, the less visible the repair.
Losing the Catchlights
Catchlight eyes are the small specular reflections of the light source in the eye. They give portraits their sense of life and depth. They are easy to accidentally clone over during glare removal, especially when the glare sits at the edge of the iris.
After any cloning or composite work over the eye area, zoom to 100% and check that any original catchlights have been preserved or recreated consistently. If catchlights were removed, repaint them using a small hard-edged brush at low opacity on a new layer set to Screen or Normal mode. Keep them consistent with your key light position. A catchlight at 10 o’clock in one eye and 2 o’clock in the other immediately signals retouching.
Plastic Skin Around the Lens Edge
When healing or cloning close to the skin at the lens border, it is easy to soften texture that should remain visible. The result is a small zone of unnaturally smooth skin immediately surrounding the lens, which reads as a telltale sign of heavy retouching.
Use the lowest opacity and flow that still achieve the repair. If texture has been lost, restore it subtly rather than leaving the area unnaturally smooth. If needed, use the Texture slider in Camera Raw locally to recover the surrounding texture.
Visible Composite Edges
In a two-exposure composite, a hard edge between the glasses layer and the no-glasses layer appears as an unnatural boundary. It shows as a sharp line where the lens meets the skin or frame. This happens when the layer mask is painted at full opacity with a hard brush.
Always use a soft brush at the mask edges. A subtle feathered transition usually blends naturally. For critical work, zoom to 200% and check the lens perimeter before merging or exporting the image.
Mismatched Tone in the Lens Area
After cloning or compositing, the repaired lens area sometimes appears slightly brighter or cooler than the surrounding lens. This is most visible when viewing the image at final export size rather than at close zoom.
Step back from 100% to 50% or 33% zoom periodically during retouching. Colour and tone mismatches that are invisible at close range become obvious when viewing the full frame. If the repaired area reads differently, use a clipped Curves or Hue/Saturation adjustment to bring it into line.
Every one of these errors is easier to prevent than to fix after flattening. Work non-destructively on separate layers throughout, and check the full image at reduced zoom before committing to the final image.
Ignoring Lens Distortion
Eyeglass lenses often introduce subtle magnification or distortion. When compositing from another frame or mirroring the opposite eye, avoid making the eye appear unnaturally sharp, perfectly symmetrical, or free of the subtle magnification created by the lens. Match the optical character of the original lens to keep the result believable.
Eye Direction Mismatch
When compositing from another frame or mirroring the opposite eye, make sure both eyes remain focused on the same point. Even a slight mismatch in gaze direction is immediately noticeable and makes the portrait feel unnatural.
AI-Assisted Glare Removal
AI tools have become a practical addition to the portrait retouching workflow, particularly for straightforward cases and high-volume work. They do not replace manual retouching for complex situations, but they handle a specific range of problems faster than traditional Photoshop methods.
Where AI Performs Well
AIglare removal works most reliably when the glare is localised, does not cover the entire eye, and the surrounding image context is clean. In these cases, the model has enough surrounding visual information to generate plausible replacement detail.
Photoshop’s Generative Fill is the most accessible starting point for retouchers already working in a Photoshop-based workflow. Select the glare area with the Lasso tool, then use Generative Fill to generate plausible replacement detail. For isolated hotspots on the lens surface where the eye is still partially visible, results are often usable with minor cleanup. Generate several variations rather than accepting the first result.
Dedicated desktop and web applications offer glare removal as part of a broader portrait retouching pipeline. These are useful for photographers who need a fast first pass on a large set before final manual review.
Where AI Falls Short
The limitations become clear quickly on more demanding cases. When glare covers the eye completely, AI has no underlying eye information to work from. It generates plausible-looking content, but anatomical accuracy is inconsistent. Eyes can appear slightly wrong in shape, gaze direction, or iris detail in ways that are difficult to correct without rebuilding the area manually.
Complex reflections in glasses are another weak point. AI tools are not designed to separate a reflection of a photographer or window from the eye detail beneath it. They tend to blend the two together or generate new content that ignores the original eye entirely.
A practical hybrid workflow combines both approaches: use an AIglare removal tool to handle straightforward glare from glasses across a session quickly, then flag the frames where the AI result is unconvincing for manual attention in Photoshop.
Consistency Across a Portrait Series
Even when AI produces a convincing result on a single image, it may generate slightly different eye shapes, iris textures, or catchlights from frame to frame. For portrait series, review neighbouring images together rather than judging each frame in isolation.
AI Tools for Glare Removal
Several glasses glare removal apps and desktop tools are available for photographers who need results without a full manual editing workflow. When looking for an app that removesglare from glasses, keep in mind that results vary widely depending on glare severity and the complexity of the reflection. For photographers who want to remove glare from a photo free, several freemium tools offer a fast first pass before manual review. The most popular desktop and mobile tools for AI glare removal are listed below.
| Tool | Platform | Best For | Notes |
|---|---|---|---|
| Photoshop Generative Fill | Desktop | Complex cases, integrated workflow | Most control, requires Photoshop subscription |
| Lightroom Remove Tool | Desktop | Quick fixes within existing workflow | Best for minor glare and cleanup, not full eye reconstruction |
| Luminar Neo | Desktop | Portrait batch processing | Standalone app, useful for portrait enhancement, limited on severe glare |
| Remini | Mobile | Quick fixes on single images | Limited control, consumer-oriented |
Results across all remove glarefrom glasses tools vary significantly depending on glare severity, lens type, and how much eye detail remains visible beneath the reflection. Always review output at 100% zoom before delivery.
For portrait series where consistency matters, these tools are best used to identify and speed through easy cases, leaving only the difficult frames for manual retouching. The next section focuses on retouching plugins that speed up portrait retouching after glare has already been corrected.
Retouch4me Workflow After Glare Removal
For photographers who want to speed up the process, Retouch4me Apex can handle glasses glare directly with AI. Its Glasses Glare Removal tool is designed to remove glare and reflections from eyeglasses, reducing the amount of manual cloning, healing, or compositing needed in many portraits.
Apex works either as a standalone application or directly inside Photoshop as a plugin. That makes it useful for photographers who want a dedicated AI retouching workflow, as well as retouchers who prefer to stay inside Photoshop and combine automated glare removal with manual adjustments when needed.
Apex: AI Glasses Glare Removal
Open the portrait in Apex and apply the Glasses Glare Removal tool to reduce or remove reflections from the lenses. Because Apex combines glare correction with other portrait retouching tools in the same interface, you can continue with skin, eye, clothing, and background adjustments without moving between separate applications.
For photographers already working in Photoshop, Apex can be launched as a plugin, so the AI-assisted glare removal becomes part of the existing Photoshop workflow rather than a replacement for it. Apex is also available as a standalone app when Photoshop is not required.
After the glare itself has been corrected — manually or with Apex — the next step is making sure the surrounding skin and eye area remain natural and consistent.
Heal: Skin Finishing After Manual Retouching
Manual glare removal can leave subtle traces. Clone Stamp work near the lens edge can soften adjacent skin texture. Healing close to the eye area can disturb the surrounding tone. Even careful compositing work can leave the skin around the lens looking slightly different from the rest of the face.
Individually, these changes are subtle. Across a portrait series, however, they become much more noticeable if the finishing is not consistent.
Retouch4me Heal addresses these finishing inconsistencies as part of a broader skin-retouching workflow. It works on blemishes, uneven texture, and small inconsistencies across the face — including the areas around the lens that were disturbed during glare removal. Because it is designed to preserve natural-looking skin texture, it integrates naturally into the existing Photoshop or standalone workflow without requiring a separate manual pass over the affected areas. Heal is available as a Photoshop plugin, as a standalone application, and through Apex and Arams, which means it fits into the workflow regardless of how you deliver files.
👉 Try Retouch4me Heal
Using Apex Across a Portrait Series
When a wedding or event session includes 50, 100, or more portraits with eyeglasses, applying consistent retouching across the full set manually is time-consuming. After glare has been corrected on the frames that needed it, Apex can handle the automated retouching pass across the entire set.
Apex applies portrait retouching uniformly across a batch, maintaining consistent skin quality, tone, and finish from frame to frame. For photographers who have already done the difficult work of glare removal, Apex removes the bottleneck of manual finishing on every remaining image.
The workflow in practice looks like this:
- Identify frames with glare during culling
- Correct glare only on the affected frames using the methods covered in this guide
- Run the corrected and unaffected frames together through Apex for consistent finishing
- Review the batch output and address any frames that need additional attention
Retouch4me tools are not designed for glare removal. Their role is to streamline the portrait retouching that follows, making large portrait series faster to finish while maintaining a consistent look from frame to frame.
For a complete portrait editing workflow, see our guide on Color Correction and Color Grading for Photographers.
Key Takeaways
- Prevention saves more time than any Photoshop method. Adjusting light position, camera angle, or asking the subject to tilt their chin costs seconds on set. Adjusting light position or camera angle costs seconds on set and will improve your results more than any Photoshop method.
- The two-exposure composite is the most reliable retouching method. Shooting a clean backup frame without glasses takes a few extra seconds during the session and eliminates the need for pixel reconstruction entirely.
- Quick fix tools work well when eye detail is still visible. Spot Healing Brush, Clone Stamp Photoshop, and the Camera Raw Filter each solve a different type of glare in photos. Matching the method to the problem produces faster and cleaner results.
- Catchlight eyes must be preserved or deliberately recreated. Cloning or compositing over the eye area without checking catchlight consistency is one of the most common reasons a retouched portrait looks flat.
- Non-destructive retouching is not optional. Glare removal involves multiple small decisions that are easy to undo on separate layers and nearly impossible to correct after flattening.
- AI can speed up glasses glare removal directly. Retouch4me Apex includes a dedicated Glasses Glare Removal tool for removing glare and reflections from eyeglasses, either as a standalone app or inside Photoshop. Manual retouching can still be used when a frame needs more precise reconstruction or cleanup.
- Consistent finishing across a series matters as much as the glare removal itself. Individual frames can look correct in isolation but read as inconsistent when delivered as a set. Headshot retouching at scale requires both precision and workflow discipline.
Frequently Asked Questions
Q: Can you remove glasses from a face entirely in a photo?
A: Removing eyeglass glare and removing the glasses themselves are two different tasks. This guide covers glare removal only. If you need to remove the glasses entirely from a portrait, that requires generative AI tools such as Photoshop Generative Fill or Photoroom, which generate plausible facial detail where the glasses previously covered the face. Results depend heavily on the complexity of the frame shape and surrounding facial features.
Q: What should I do if I have no clean frame without glasses?
A: Start with the quick fix methods: Spot Healing Brush for small hotspots, Clone Stamp Photoshop for larger areas, and Camera Raw Filter for soft diffuse glare. If glare covers the eye completely and no backup frame exists, try mirroring the opposite eye or using Photoshop Generative Fill on the affected area. A nearby frame from the same session where the reflection falls differently is also worth checking before attempting reconstruction.
Q: Does the approach differ for sunglasses?
A: Yes, significantly. Standard eyeglass lenses are transparent, so some eye detail usually survives even heavy glare. Many sunglasses are dark enough that little or no usable eye detail remains beneath the reflection. Without a no-glasses backup frame, reconstruction is not possible in any realistic sense. For sunglasses portraits, the two-exposure technique shot on set is the only reliable path to a glare-free result.
Q: How do I remove blue light reflection from the monitor in photos?
A: How to remove blue light from glasses in photos is more of a prevention question than a retouching problem. Blue lightreflections from screens are a prevention problem more than a retouching problem. On set, tilt the monitor screen slightly away from the subject, move the screen further back, or position it at a wider angle relative to the glasses. For video calls, glasses with non-prescription demo lenses or lens-free frames are a practical option. In post, a localised Hue/Saturation adjustment targeting the blue light range inside the lens area can reduce the colour cast, though it cannot recover obscured eye detail.
Q: Is there a remove glare from glasses app or free online tool?
A: Several free or freemium web tools offer AI glare removal online. If you are looking to remove glare from photo free, results vary widely depending on glare severity. For minor hotspots, a free glasses glare removal app can produce a usable result quickly. For complex glare covering the eye, or for professional portrait delivery, manual retouching in Photoshop remains the more reliable approach. Free tools are best treated as a first pass rather than a final solution for important portraits.
Q: Can a polarizing filter remove glasses glare?
A: A circular polarizing filter can reduce glare glasses in certain lighting situations, particularly in natural light, but it cannot eliminate all glasses glare. Its effectiveness depends on the lighting, the angle of the reflection, and the lens coating.
Q: Why does glasses glare appear in photos but not in real life?
A: Your eyes constantly adjust to changing reflections, while the camera records a single moment from a fixed angle. Reflections that your brain largely ignores can become very noticeable in a photo, especially when a flash or bright light source is positioned near the camera.