Export photographs and verify saved files
What you will do
Section titled “What you will do”Save selected photographs as full-resolution JPEGs in a new subfolder beside the originals. Keeping exports in their own folder makes them easy to find without replacing your source files.
Before you start
Section titled “Before you start”- Import your photographs and wait until their thumbnails appear.
- Keep the full-resolution originals. Use a new subfolder for the exported JPEGs so that you do not overwrite or mix them with the source files.
- This procedure uses Local mode. You can clear all retouching tools when you only want to save JPEG copies.
Select the photographs and prepare the export
Section titled “Select the photographs and prepare the export”- Select the photographs you want to export. To select all photographs in the current view, click one photograph and press Ctrl+A.
- Open the export panel using the upward-arrow icon at the far right.
- Select Local.
- Open All in the tool list. Clear every checked tool if you want to export without retouching.
- Open Export settings.
Choose the destination and file settings
Section titled “Choose the destination and file settings”- Under Export to, choose Hard drive — To computer.
- Under Photos to Export, choose the selected photographs. Rejected photographs are not counted or exported.
- In the folder selector, choose Original Files Folder.
- Turn on Put in Subfolder.
- Enter a descriptive subfolder name, then click outside the field to finish editing it.
- Under Naming and Overwriting, choose Add to the Name: -retouched.
- Leave Add to Current Project unchecked if you do not want the exported copies to appear in the current project.
- Turn Resize to fit off to preserve the original pixel dimensions. Turn it on only when you need smaller output for a specific use.
- Select JPEG under Format.
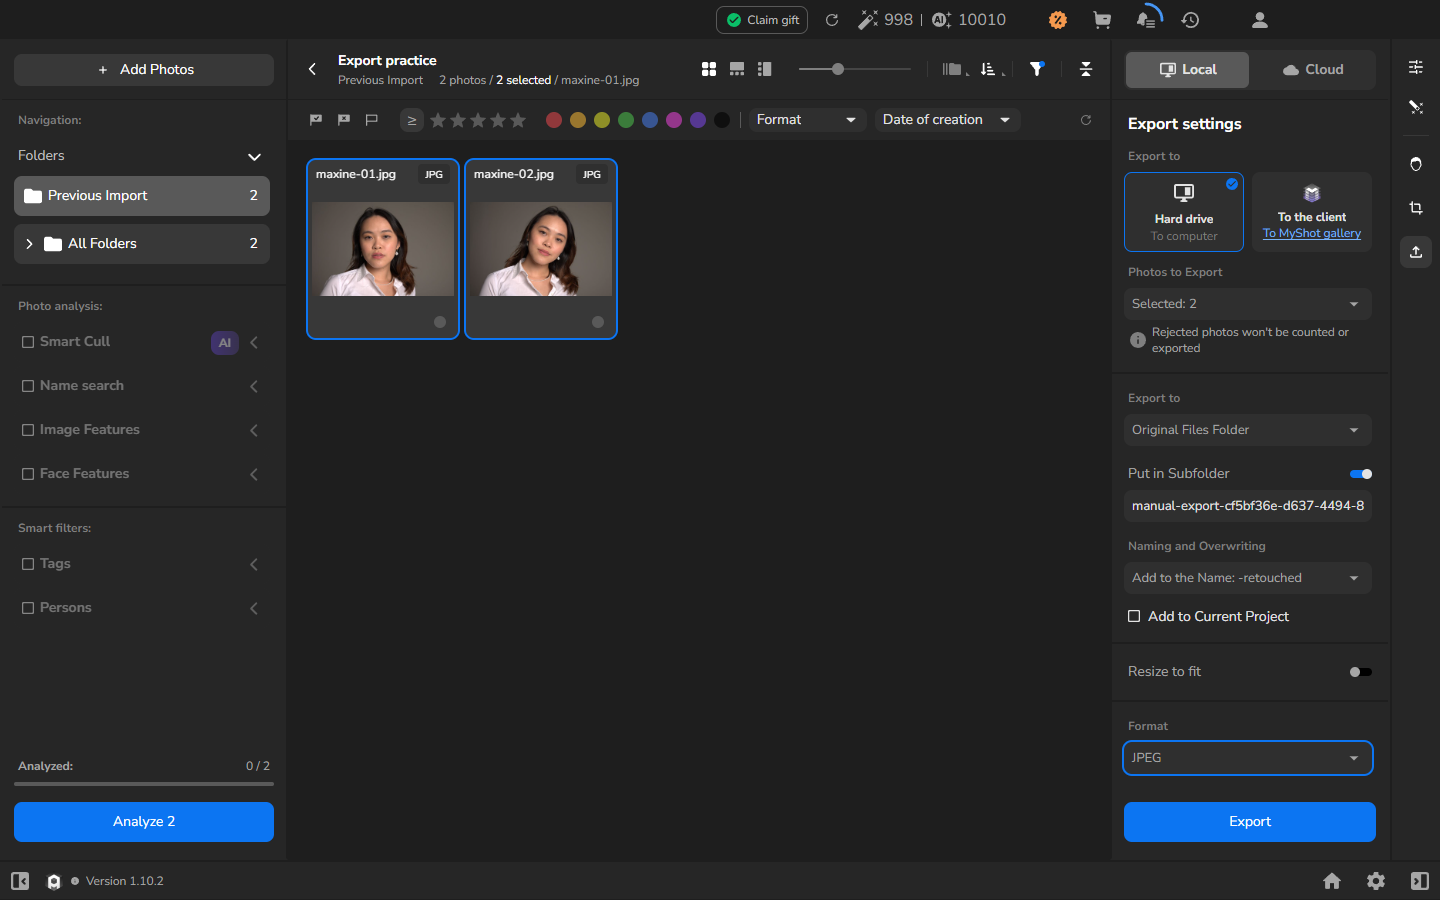
The naming option adds -retouched even when no retouching tools are active. Choose another naming rule if that suffix would be misleading for your files.
Export and check completion
Section titled “Export and check completion”- Review the selected count, destination, subfolder name, filename rule and format.
- Click Export at the bottom of the panel.
- Open the export history using the history/clock icon in the top bar.
- Find the new Export task in EXPORT AND RENDER HISTORY.
- Wait for the task to show Completed and 100% before opening the exported files.
Check the saved files
Section titled “Check the saved files”Check the files themselves before delivering them or removing any working copies:
- In Windows File Explorer, open the folder containing the original photographs.
- Open the subfolder you entered in Put in Subfolder.
- Check that there is one exported JPEG for each selected, non-rejected photograph and that the filenames follow your chosen rule.
- Open the exported files in an image viewer and check them at a useful zoom for blank areas, corruption or an unexpected crop.
- If Resize to fit was off, confirm that the exported files retain the pixel dimensions of their originals.
- Confirm that the original files remain in their original folder.
If the result does not match
Section titled “If the result does not match”- The selected count is wrong: return to the grid and check your selection before starting the export. Also check whether a photograph is rejected; the export panel explicitly excludes rejected photos.
- You cannot find the files: compare the source folder and your subfolder name with Original Files Folder and Put in Subfolder. Do not assume that the destination is the project storage folder.
- The files are absent from the Arams grid: if Add to Current Project was unchecked, look for the saved files in the destination folder instead.
- A filename ends in -retouched although no tool was enabled: this is the selected naming rule.
- The task does not complete or a file will not open: note the task status and exact error message. Do not remove or replace the originals; retry only after you have identified the problem.